Windows Server
Tested on Windows Server 2019 and 2022.
If you haven’t already, consider Docker. It requires less server configuration and is the recommended deployment approach. Windows Server is a supported alternative for environments where containers aren’t an option.
Build your project
Section titled “Build your project”Before copying files to the server, configure Next.js to produce a standalone output. Edit web/next.config.ts and add output: 'standalone' to the nextConfig object:
import type { NextConfig } from 'next';
const nextConfig: NextConfig = {  output: 'standalone',};
export default nextConfig;
Fill in your production values, then build. npm ci creates web/.env.local from .env.example; open it and set the real production value for every variable, replacing the localhost defaults. The build reads .env.local and bakes the browser-facing (NEXT_PUBLIC_*) values into the app. See build-time vs run-time variables.
npm --prefix web ci # also creates web\.env.local from .env.example if it's missing# open web\.env.local and set your production valuesnpm --prefix web run buildThis produces three folders to copy to the server:
| Folder | What it contains |
|---|---|
web/.next/standalone/ | The app and its minimal dependencies. Contains a server.js entry point. |
web/.next/static/ | Compiled CSS, JS, and fonts. Goes inside <deploy-folder>/.next/static/. |
web/public/ | Static assets (favicon, images, etc.). |
How the pieces fit together
Section titled “How the pieces fit together”Two programs work together on this server:
- Your app runs as a Windows Service (a background program Windows keeps running and restarts if it stops). It’s reachable only from the server itself, not the internet, and it receives requests on a port (a numbered connection point):
3000unless you change it. - IIS (the web server built into Windows) faces the internet on port
443(the standard forhttps://sites) and forwards each request to your app’s port.
One number has to match in two places: the PORT you give the Windows Service and the port in the web.config rewrite (http://127.0.0.1:3000). If they don’t match, IIS forwards requests to a port where nothing is listening.
To run more than one app on the machine, give each its own port (3000, 3001, 3002) and point each app’s IIS site at its port. See Hosting multiple apps on one server.
One-time server setup
Section titled “One-time server setup”-
Install Node.js 22 (or newer) from nodejs.org using the MSI installer.
-
Install IIS (Windows’ built-in web server). On Windows Server, add it from Server Manager → Add roles and features → Web Server (IIS).
-
Install the two IIS add-on modules that let IIS act as a reverse proxy. Install them in this order: ARR depends on URL Rewrite being present first.
- URL Rewrite: www.iis.net/downloads/microsoft/url-rewrite
- Application Request Routing (ARR): www.iis.net/downloads/microsoft/application-request-routing
Each page has an Install this extension button that downloads an MSI. Run the URL Rewrite installer first, then the ARR one.
-
Install NSSM from nssm.cc. NSSM lets you run any program as a Windows Service, so your app starts automatically on boot and restarts if it crashes.
Deploy
Section titled “Deploy”-
On the server, create a deployment folder (e.g.
C:\apps\my-app\). Copy the contents ofweb\.next\standalone\(not the folder itself) into that root, then add the static and public folders:C:\apps\my-app\├── server.js├── package.json├── node_modules\├── .next\server\├── .next\static\ ← from web\.next\static\├── public\ ← from web\public\└── .env ← your build machine's .env.local, saved as .env -
Copy the
web/.env.localyou built with into the deployment folder, saving it asC:\apps\my-app\.env(next toserver.js). The standalone server reads this.envautomatically on startup for the server-side values; the browser-facingNEXT_PUBLIC_*ones are already baked into the build. If your project has no server-side variables, there’s nothing to copy, so skip this step. -
Register the app as a Windows Service. It points at
server.js; the settings below supplyNODE_ENV/PORT/HOSTNAME, and the app auto-loads the.envfrom step 2 for everything else:Terminal window nssm install MyApp "C:\Program Files\nodejs\node.exe" "C:\apps\my-app\server.js"nssm set MyApp AppDirectory "C:\apps\my-app"nssm set MyApp AppEnvironmentExtra +NODE_ENV=production +PORT=3000 +HOSTNAME=127.0.0.1New-Item -ItemType Directory -Force -Path "C:\apps\my-app\logs" | Out-Nullnssm set MyApp AppStdout "C:\apps\my-app\logs\stdout.log"nssm set MyApp AppStderr "C:\apps\my-app\logs\stderr.log"nssm set MyApp AppRotateFiles 1nssm set MyApp AppRotateBytes 10485760nssm start MyAppHOSTNAME=127.0.0.1means the Node process only accepts connections from IIS. Nothing outside the server can reach port 3000 directly. -
Set up IIS as the reverse proxy — see the next section. This is the last step, but it has several parts, so it’s broken out below.
Set up IIS as the reverse proxy
Section titled “Set up IIS as the reverse proxy”IIS accepts HTTPS on port 443 and forwards every request to the Node service on port 3000. Do these parts in order. Everything here is done in IIS Manager (Start → search “IIS”).
1. Create a home folder for the IIS site
Section titled “1. Create a home folder for the IIS site”Every IIS site needs a physical home folder, even though this one serves no files from disk. All traffic is forwarded to Node. This folder is also where the site’s web.config lives. Keep it separate from the Node app folder so IIS settings and app files don’t mix:
New-Item -ItemType Directory -Force -Path "C:\apps\my-app-site" | Out-Null2. Add the website
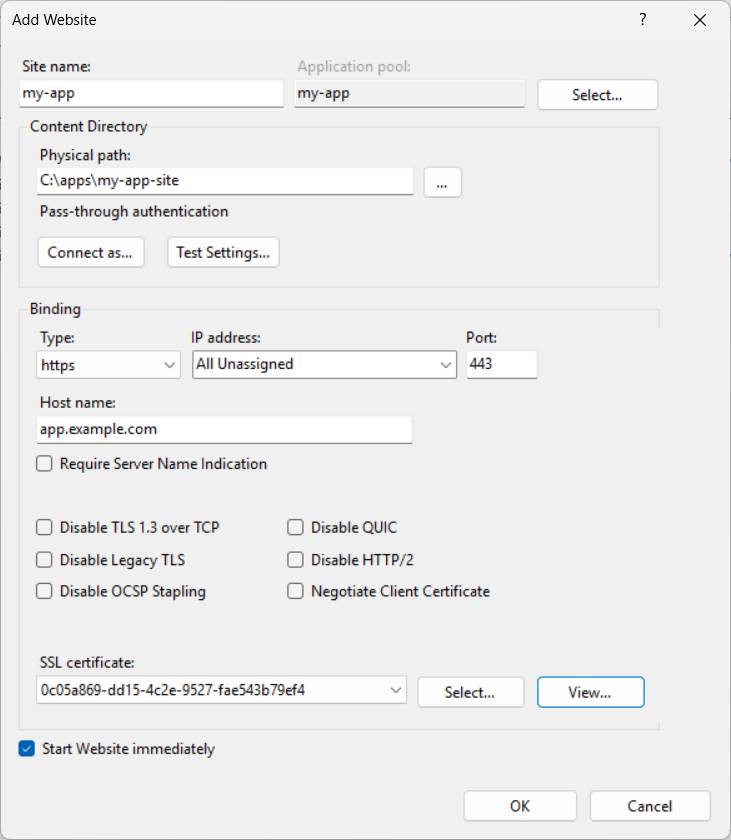
Section titled “2. Add the website”In the Connections pane on the left, right-click Sites → Add Website… and fill in:
| Field | Value |
|---|---|
| Site name | Anything, e.g. my-app |
| Physical path | The folder from step 1 — C:\apps\my-app-site |
| Binding type | https |
| Port | 443 |
| Host name | Your public hostname, e.g. app.example.com |
| SSL certificate | Your TLS certificate |
The https binding requires a certificate. If you don’t have one yet, see TLS certificates below — win-acme can add the port-443 binding and certificate to this site for you. In that case choose binding type http / port 80 for now and come back after running win-acme.
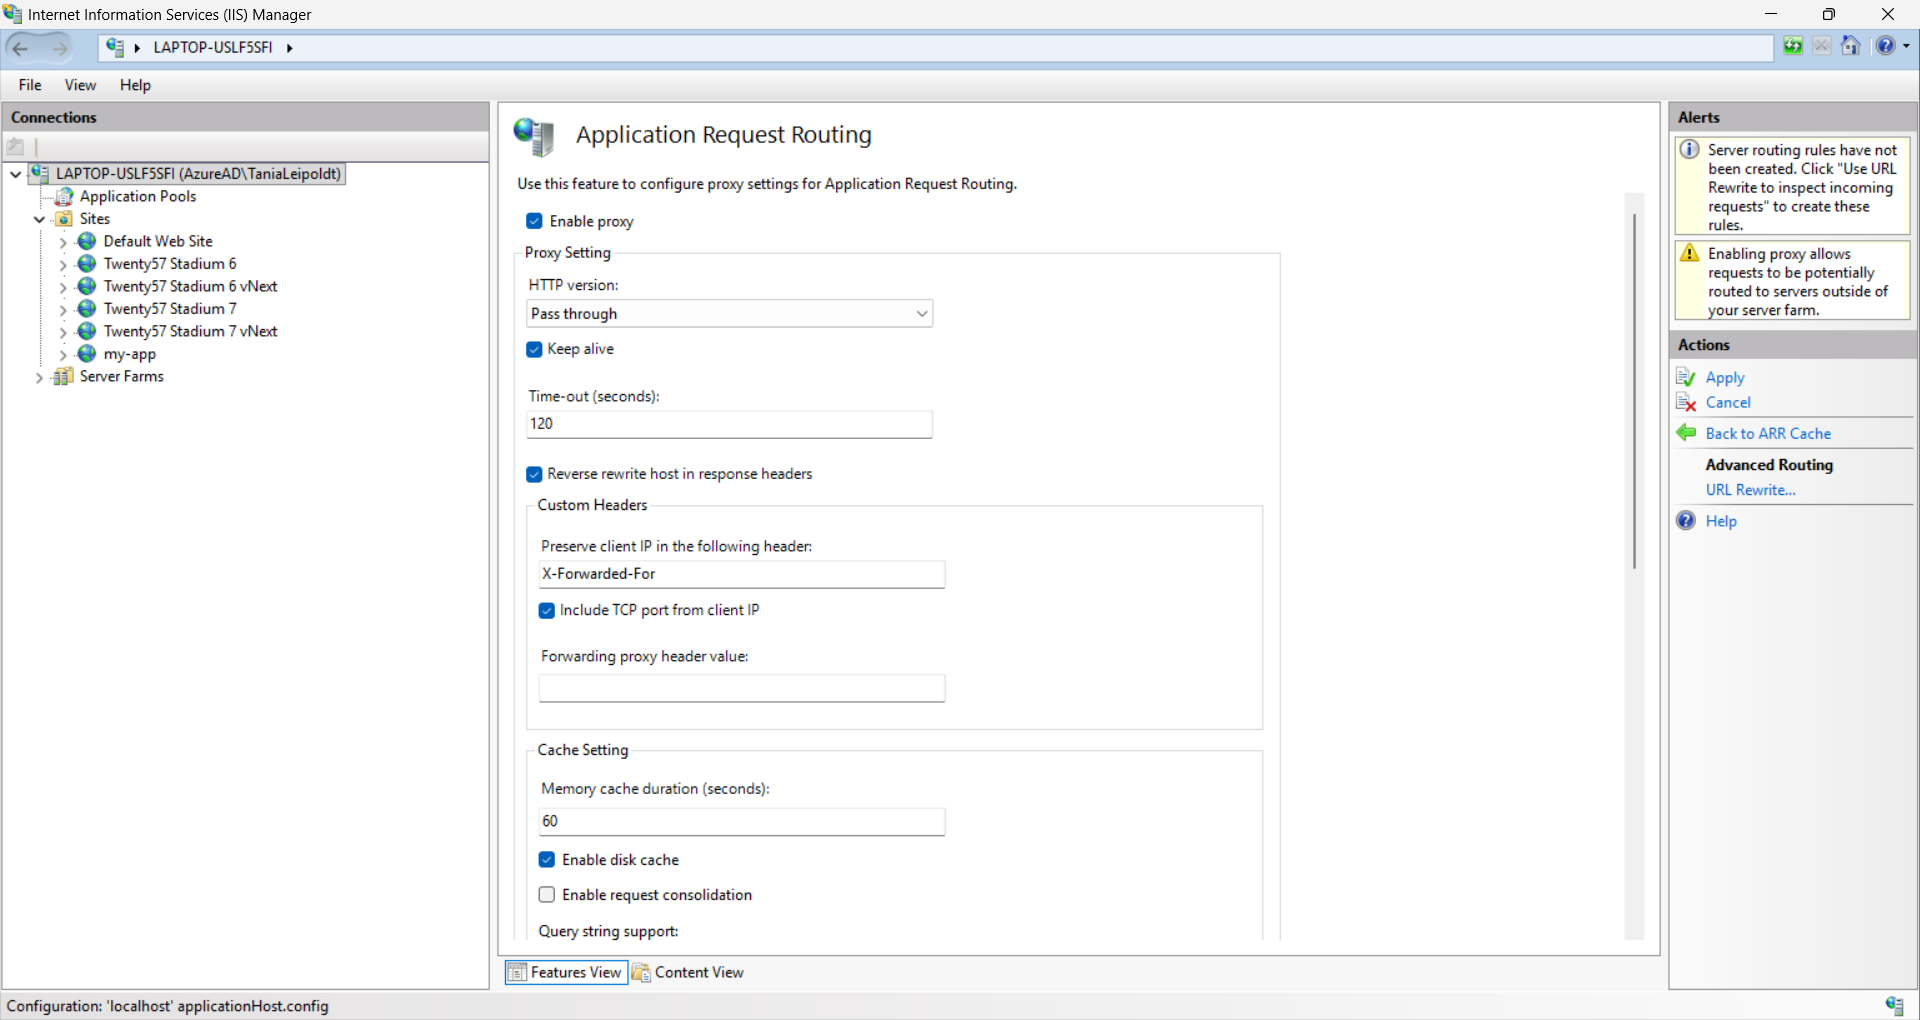
3. Turn on ARR’s proxy engine (once per server)
Section titled “3. Turn on ARR’s proxy engine (once per server)”ARR’s proxy is off by default. Forgetting this step is the most common reason the proxy appears to do nothing: the rewrite rule in step 6 then fails silently. Turn it on once:
- Click the server node at the top of the Connections pane (it’s named after your machine, not after a site).
- Double-click Application Request Routing Cache.
- In the Actions pane, click Server Proxy Settings….
- Tick Enable proxy, then click Apply.
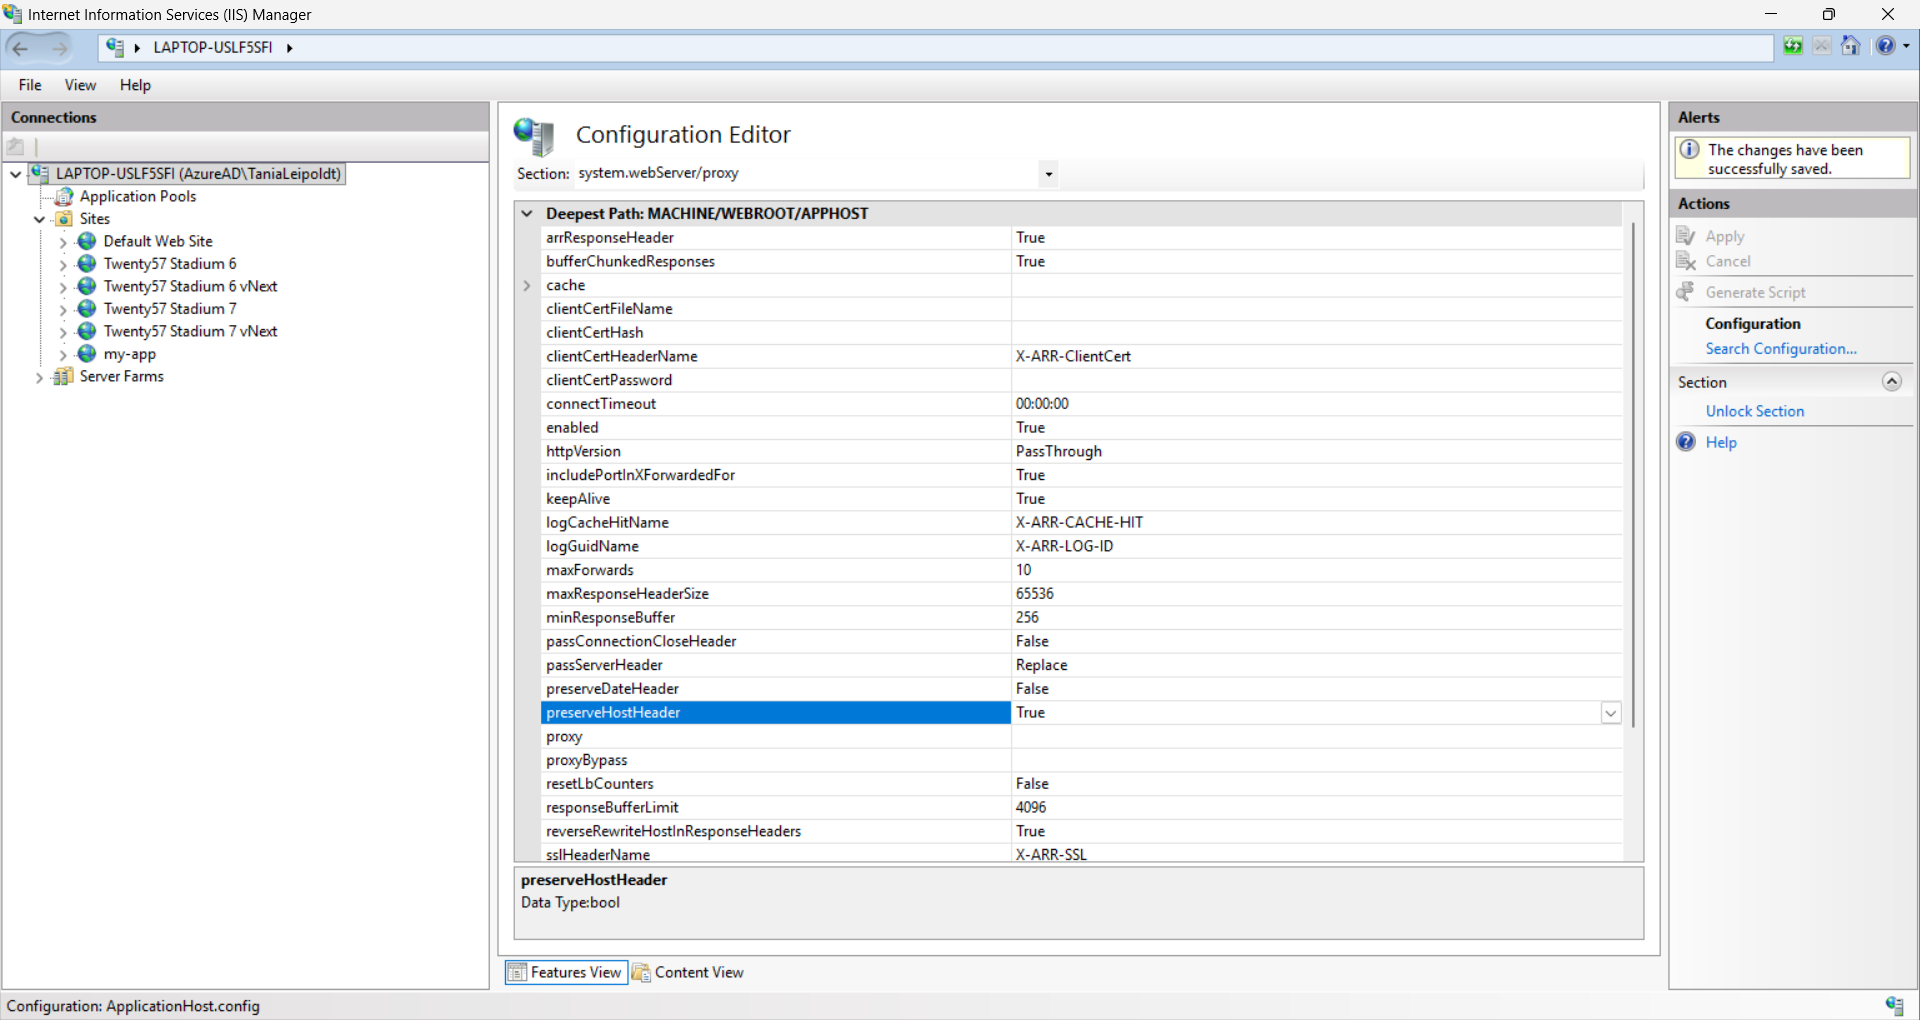
4. Preserve the original hostname (once per server)
Section titled “4. Preserve the original hostname (once per server)”So your app sees the real hostname (app.example.com) instead of 127.0.0.1, tell ARR to pass the original Host header through:
- With the server node still selected, double-click Configuration Editor.
- In the Section dropdown, choose
system.webServer/proxy. - Set preserveHostHeader to
True, then click Apply.
5. Allow the forwarded headers
Section titled “5. Allow the forwarded headers”The rewrite rule in step 6 sets two request headers, X-Forwarded-Proto and X-Forwarded-For. IIS ignores server variables it hasn’t been told to allow. Add them to the allowed list:
- Select your site in the Connections pane.
- Double-click URL Rewrite.
- In the Actions pane, click View Server Variables…, then Add… each of these:
HTTP_X_FORWARDED_PROTOHTTP_X_FORWARDED_FOR

6. Add the rule that forwards traffic to Node
Section titled “6. Add the rule that forwards traffic to Node”This rule does the actual proxying, and it lives in the site’s web.config, a file in the site’s home folder from step 1 (C:\apps\my-app-site\web.config). Adding the site in IIS doesn’t create this file; you create it yourself, and IIS picks it up automatically once it’s in the folder.
Create C:\apps\my-app-site\web.config and paste this in full:
<configuration> <system.webServer> <rewrite> <rules> <rule name="ProxyToNode" stopProcessing="true"> <match url="(.*)" /> <action type="Rewrite" url="http://127.0.0.1:3000/{R:1}" /> <serverVariables> <set name="HTTP_X_FORWARDED_PROTO" value="https" /> <set name="HTTP_X_FORWARDED_FOR" value="{REMOTE_ADDR}" /> </serverVariables> </rule> </rules> </rewrite> </system.webServer></configuration>This file holds only the rewrite rule. Enabling the proxy and preserving the host header are server-level settings (steps 3–4), not site-level ones, so they deliberately don’t belong here. Putting a <proxy enabled="true" preserveHostHeader="true" /> element in this file can trigger an HTTP 500.19 error (“configuration section is locked at a parent level”) on some servers, which is why those settings live at the server level instead.
X-Forwarded-Proto is hardcoded to https in the rule above. This is safe only because the site is bound to port 443 alone. If you add a port 80 binding to redirect plain HTTP to HTTPS, put that redirect on a separate IIS site so this proxy rule never runs against plaintext requests. Otherwise the app thinks every request was HTTPS and may set secure cookies on insecure connections.
TLS certificates
Section titled “TLS certificates”IIS doesn’t ship with a Let’s Encrypt client. The common options:
- win-acme (free, recommended): a CLI that fetches Let’s Encrypt certificates and installs them into IIS bindings. Run
wacs.exeinteractively the first time. It validates your domain, installs the certificate, binds it to port 443, and registers a scheduled task to auto-renew every 60 days. - Certify The Web: a GUI alternative. Free for up to five certificates.
- Commercial CA or internal PKI: import the issued
.pfxvia IIS Manager → Server Certificates → Import, then bind it to your site on port 443. Renewal is manual; set a reminder well before the expiry date.
Make sure renewal is automated and monitored. An expired certificate breaks the site for every user at once.
Verify
Section titled “Verify”Open your site in a browser. It should load over HTTPS without a port number.
Get-Service MyApp # is the Node process running?Get-Content "C:\apps\my-app\logs\stderr.log" -Tail 50 # any errors?IIS Manager’s Failed Request Tracing logs are useful for diagnosing proxy-level errors.
Hosting multiple apps on one server
Section titled “Hosting multiple apps on one server”You can run several independent apps on the same machine, all served on port 443. IIS reads the hostname each request asks for and routes it to the matching app, using SNI (Server Name Indication), the feature that lets one machine hold a separate certificate per hostname on the same port. Repeat the per-app pieces, giving each app its own private port:
| Per app, its own… | Example |
|---|---|
| Node service (NSSM) on its own private port | MyApp → PORT=3000, MyApp2 → PORT=3001, … (all HOSTNAME=127.0.0.1) |
IIS site bound https/443 with the app’s hostname + certificate, Require SNI ticked | app1.example.com, app2.example.com, … |
| Rewrite rule forwarding to that app’s port | http://127.0.0.1:3000, http://127.0.0.1:3001, … |
The server-level ARR settings (Enable proxy, preserveHostHeader) are set once and shared by every site, and the firewall still only needs 80/443 open; the per-app ports stay on loopback. Each hostname needs its own DNS record pointing at the server and a certificate that covers it. A single *.example.com wildcard can serve them all if they’re subdomains of one domain.
If one of those apps is a separate auth API that users’ browsers reach directly (external-provider sign-in), it needs the same second-site treatment plus one extra ARR setting turned off. See Deploying a Separate Auth API.
If your project uses cookie-based authentication, read the cookie domains section before going to production.